Follow Me

Showing posts with label baking. Show all posts

Tuesday, November 9, 2021

SSODD SA60L-1A for Sourdough?

 I have seen bakers baking sourdough by using Innofood V88 and Unox convection oven, ever since I bought this oven the main objective is to be able to bake sourdough with ear, without having me to spend another thousands on dutch oven and pizza stone or other gadgets... 

And so I tried and tried, although the sourdough I have baked mostly tasted awesome and great, some chewy recipes, some sourish recipes, and some soft and thin crust recipes, the texture were great, just not able to have ear as what home bakers are looking for at now, me too... am one of them. 

I almost gave up since already been trying almost a month. The spray function in SSODD works only for 5 seconds, anytime more than that it will flood the oven. And talked to Ms Gan about this issue, and she advised not to press more than 5 seconds, I was so upset.... 

Not when I found out in fact Innofood V88 oven need to manually injecting steam too, every minute, press one time, that inspired me. And so I decided to go for a try, tried once, failed, failed as in the sourdough didn't have ear but well baked. Second trial, failed, I tried to figure it out by examine the way I prepare and the temperature of the setting..... The oven spring not as good as what I expected. 

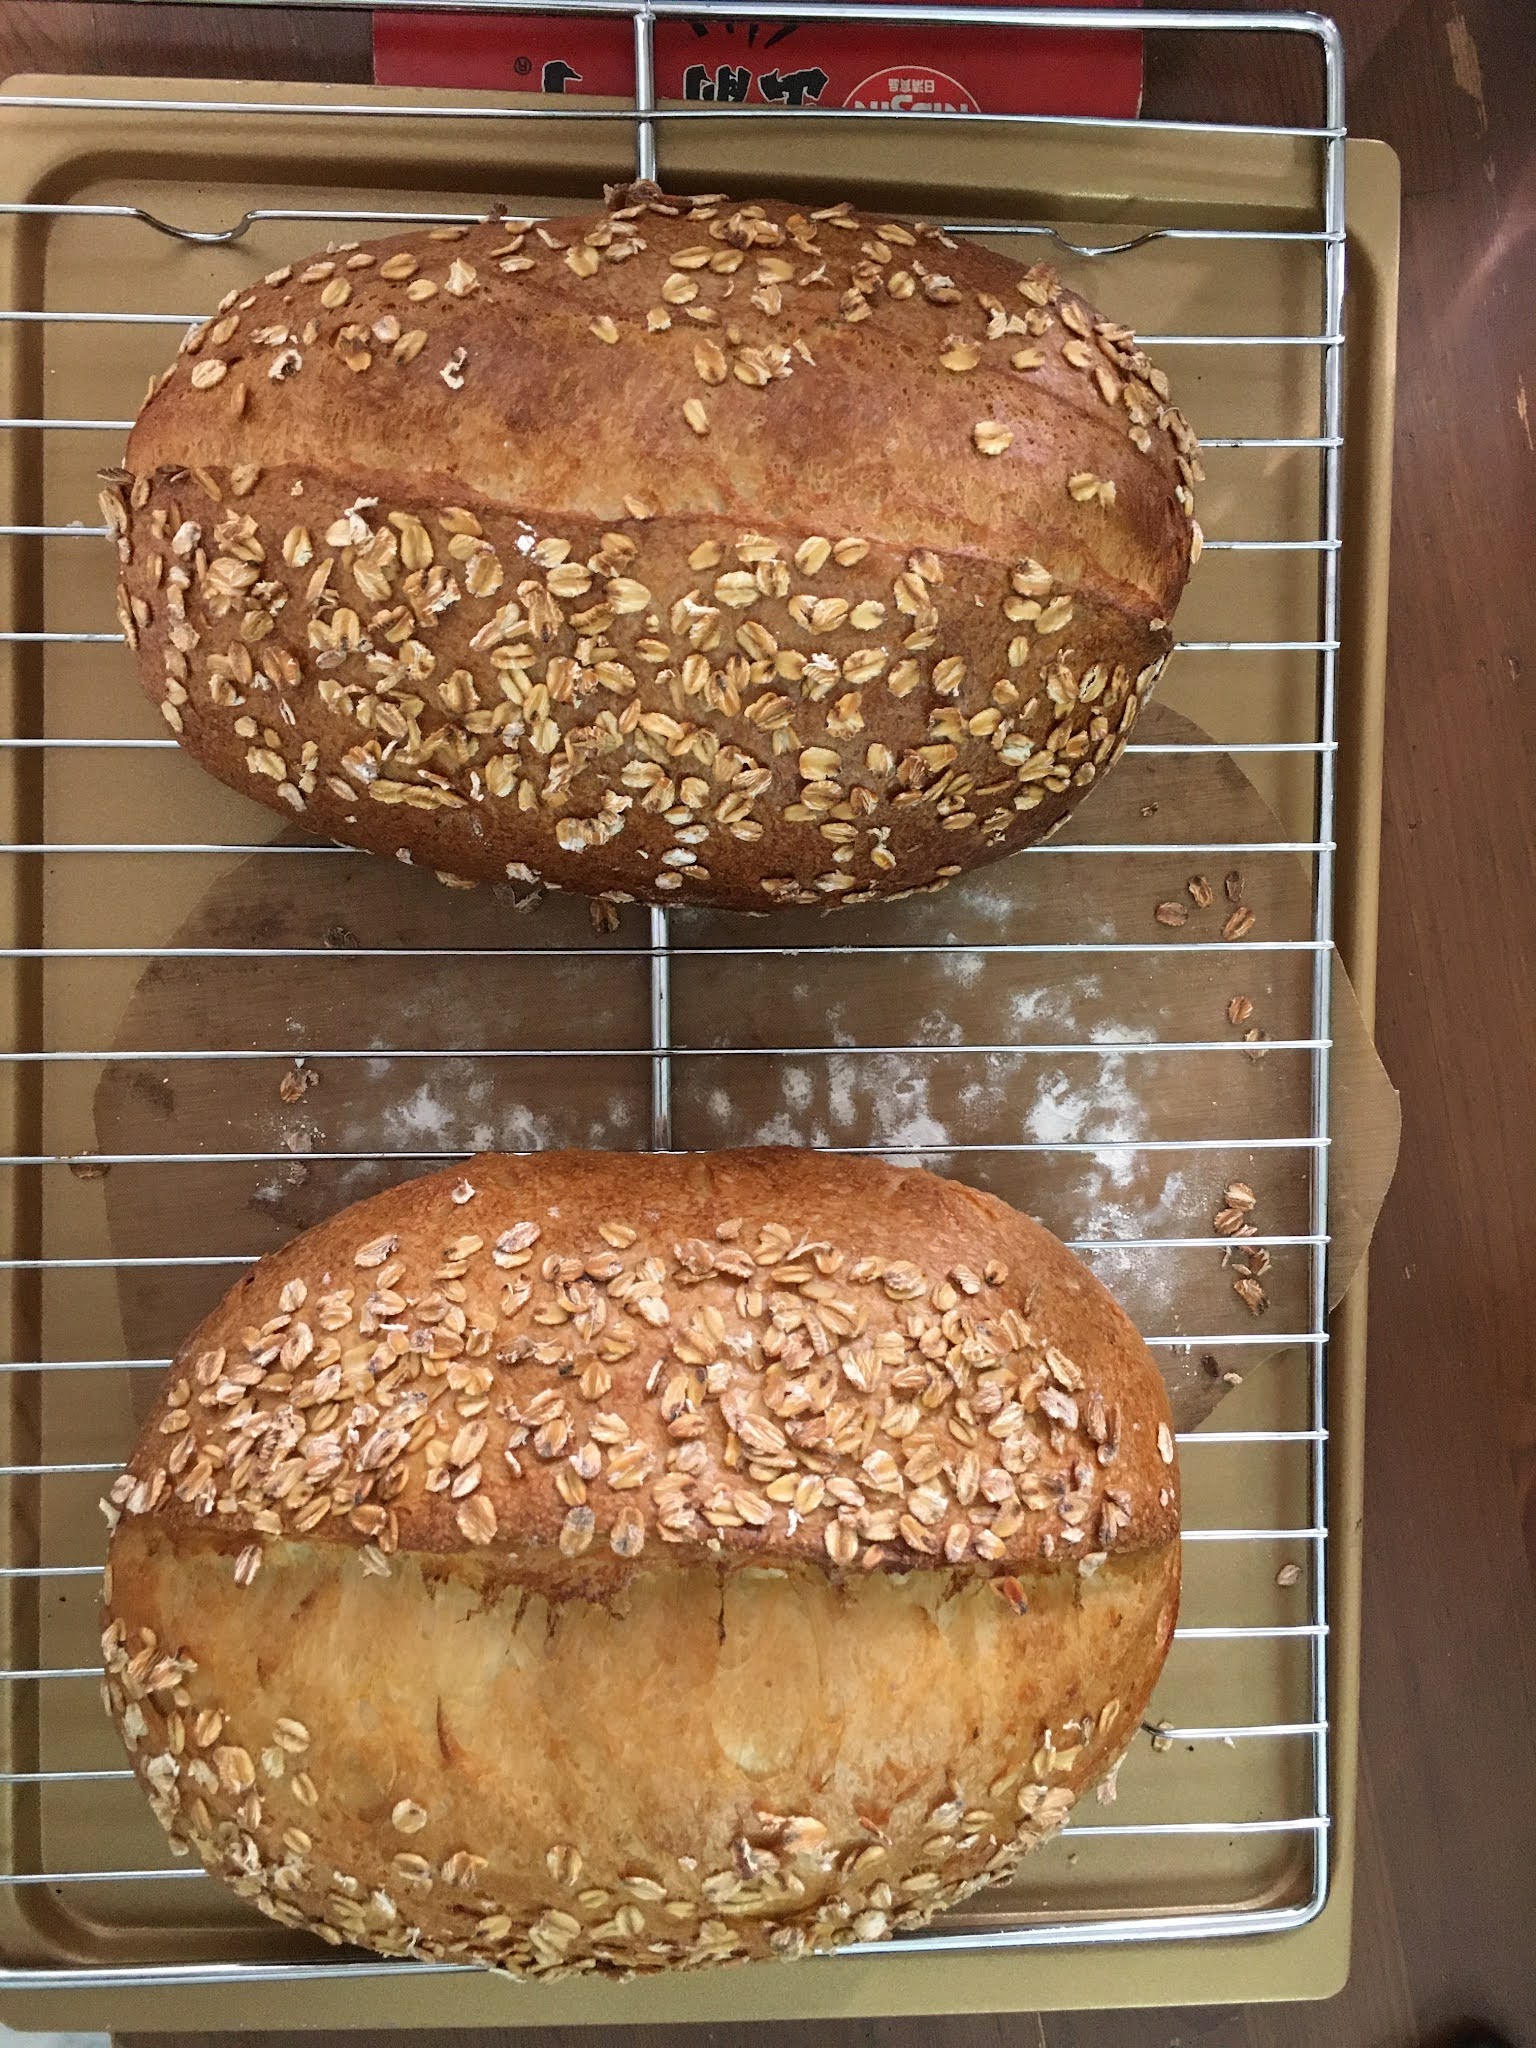
This morning, I tried the recipe Honey Oat Whole Meal Sourdough, the first dough using normal Japanese bread flour, the second dough I am using Super Melanger Japanese flour, and I need to tell you this really make the difference! Super Melanger flour can hold the dough so well, so clean, it does make everything easier for you. 

Anyhow this blog is talk about SSODD oven setting for sourdough. 

My found is: 

1) Preheat with baking sheet placed on a level above middle deck. (Keep it high so that the bread will have to soak in the steam. ( I put add-on bar in between the 2nd and 3rd deck) I think I should try on 2nd deck in next baking.

2) Need to create a lot of steam, hence the initial temperature is 260°C for 1 minute, spray during preheat when temperature oven is ready after preheat, usually took about 10 minutes, don't bake it yet, let it continue preheating, at this moment, you press spray for 5 - 6 seconds, a few time in the interval of 30 seconds, let it be 2 minutes long. Then start baking. 

3) After the door open and close, temperature will drop, steam runs away, spray immediately after the door is close, oven temperature still set in 260°C for 1 minute, press 5 -6 seconds in the interval of 30 seconds. After one minute, oven temperature back to 230°C, however, is still good to create steam, although it will a little flood in the base, but I can accept the fact that it will. haha. cheers!

First dough, oven spring well, but the scoring was rather shallow, hence it didn't perform well to create an ear. The oven setting was rather high in fan speed (fan speed 30), that makes the crust form too early. 


The second dough, that one using Super Melanger Bread Flour.


With slight changes on the fan speed, awesome! I was overwhelmed by this outcome. The bread was beautifully baked!


Thin crust, soft bread, I prefer not to bake until it is burnt and hard, my habit of taking sourdough, always like to reheat and toast it until crispy, I am totally falling in love with it! The bread can make someone falling in love, my friend Shirley kept on telling me that she doesn't like sourdough bread, not nice, hard and chewy.... and sourish...

I took this bread, and sliced it in front of her, in the mean time she kept telling friends around us, she doesn't like sourdough bread, she has a air fryer, how to use air fryer to toast a sourdough bread, just set 150°C 3 minutes, this will come out just crispy. I saw her took the first byte with butter, her eyes turned big!! And said she can't believe it that the sourdough can taste so good!!

I love sourdough breads, there are many different recipes, some like it sour, like it hard, and like it chewy, some love it soft and less sour. You may choose the type you love!


The left is using Normal Japanese Flour
Right: Super Melanger Japanese Flour

Top: Normal Japanese Flour
Bottom: Super Melanger Japanese Flour

Just sexy


I have also prepared a short Youtube tutorial.

Saturday, October 30, 2021

SSODD SA60-1A program setting

 Here is a simple steps on how to set program on SSODD SA60-1A combat oven.

This feature is very useful to me, as when I bake, I would like to change temperature to achieve best texture bread from it. For example baking cinnamon rolls, I would like to bake it at 155°C for 11 minutes, and 170°C for 4 minutes for a golden colour crunchy crust, yet softer bread inside it. 

That is very great feature that you must make good use of it. 


这个烤箱拥有程序储存技能,一个非常好用的功能特性,在烘烤面包或者蛋糕的时候,假如能够有效的控制温度,风速与时间,那么烤出来的成品一定会让你心花怒放!

比如说我在烤肉桂卷 155°C 11分钟,然后再调温度至170°C 4 分钟,这样我就能有脆皮松软的面包。

Here is the chart that I have made for How to program setting in SSODD SA60L-1A Combat oven.  SSODD 烤箱 程序设置储存教程。


SSODD SA60-1A Oven

 The new oven that I invested with, SSODD 60 litre, steam injection and a convection oven, something so new to me, that I am like a newbie in baking. 

This oven is awesome, as the temperature and fan speed did help to distribute heat evenly, that I get the best cream cheese buns, cinnamon rolls, baking a few trays at once.., the result is they are super super fluffy!


The best cinnamon rolls I have ever baked. 


The only difficulty I have is on sourdough bread. Fist attempt, temperature too high and however they look super sexy though. 


And later, with some adjusted, I would prefer softer and thiner crust. 

Every baking is an experiment to me, different settings. 

SSODD SA60-1A 
It has program setting, I am playing with it this week. Will come out an introduction and steps to do it in new post. 


Sunday, January 17, 2021

Wholemeal Sourdough


Feed one day earlier 1:5:5 sourdough starter 
10g starter : 50g water : 50g flour
(20% of total flour hence is 60g)


Wholemeal Sourdough Recipe:

Feed one day earlier 1:5:5 sourdough starter 
(20% of total flour hence is 60g)

Autolyse

In the morning mix this bread dough, allow one hour for autolyse 
200g water 60%
260g flour
70g wholemeal

After one hour:
Add 60g sourdough starter
+ 1/4 tsp salt

Foldings

Hand knead them together, just keep folding. 

Cover with cling wrap for one hour.

1st folding then rest one hour

2nd folding and rest one hour

3rd folding and rest one hour

4th folding and rest one Hour.

Shape and bulk fermentation 

Remove dough on a lightly flour working top. Last folding and using a scraper do a few twist and pull, to make sure the dough is tightened. Rest for 4 hours. (Malaysia normal weather)

Cut a small dough keep in a small glass jar for observation. Place next to whether you keep the dough. From here you will know when is the dough ready to be baked*. 

I usually just use a 7" cake tin lined with baking sheet. After 4 hours, score the dough with a blade, then preheat oven at least 20 minutes.

or I used a drain basket, cover with linen heavy floured, after 4 hours, remove dough from the linen carefully, place in a lined baking tray. Score the dough.


Bake 240C  for steam bath oven for 30-45minutes depends on personal preference. 


*Baking tips shared by The Baker Code  is clear and practical. I have learned 1:5:5 ratio from him.

Wednesday, January 13, 2021

WHOLE MEAL SOFT BREAD

 WHOLE MEAL SOFT BREAD THERMOMIX RECIPE:


WHOLE MEAL SOFT BREAD THERMOMIX RECIPE:

Ingredient A

50g Butter, cut into pieces
300g Milk + one egg
100g Sourdough starter (optional)
2 tsp Dried Yeast
60g Sugar


Ingredient B

100g Whole meal flour
430g Bread flour 
1.5 level tsp salt


Preparation:

1) Put ingredient A into bowl
    3 min  / 37°C / speed 2

2) Add ingredient B to knead
    3 min / knead

3) Wrap dough in baking silicon mat, let rise in a warm place approximately 1 hour.

4) Divide dough into 6 portion, press air out and roll into oblong shape. Place them on a line baking tray. Let it rise for 1.5 hour. Rise in the oven (that's what I will do usually)

5) (Remember to remove the tray from oven before preheat oven.) Bake in a preheat oven to 180°C for 25 minutes or until bread sounds hollow when tapped on the underside.

6) Allow to cool on a cooling rack before slicing.


无酵饼

前天烘焙了第一批的无酵饼后,教会朋友留言拜托我是否能烘焙无酵饼给教会使用,毫不犹豫的答应了!既然要给上帝的就要做到最好。感觉第一次烘焙的无酵饼有点硬,所以想了想,换一个食谱。


昨晚上第二次做无酵饼,试用了中筋面粉,效果更硬,太厚了,没抹油,色泽暗淡呈灰褐色。
 
切块太小片了,对一些人来说,在小袋子里拿出这么一小片的东西,是真的有点难度!也实在很硬,要使劲的起咬嚼!


今天再试一个用了高筋面粉,擀出了了前所未有的薄度。
100克天然酵母
100克 水
250克 面粉
1/4 茶匙 盐
因为用了天然酵母,所以面粉量就比较多了。
220C 8-10分钟 因为我的烤箱火不均匀,上面放了一层铝箔隔热,所以需要10分钟的时间。

一坨面团分四份。
第一片,焦了!
第二片,切块后才记得要抹油, 有点麻烦,小片的面团会被粘上来,花多了时间去整理这个!
第三片,抹油了,忘记切块🥴  我这。。。是干什么来的?
第四片,程序,步骤,时间都做对了!终于完美结束!


这些都会分给其他小组组员。爱心分享!

Monday, January 11, 2021

Espresso Cupcakes

Espresso cupcakes

This recipe is shared by my sister. 

Espresso Coffee Choc Cupcakes
Preheat oven 180°c
Bake time : 20mins

Ingredients
100g dark choc, chopped
150gm unsalted butter at room temperature
2 eggs
100gm castor sugar 
2 tbsp cocoa powder
100gm self-raising flour
2 tsp instant coffee dissolved in 1 tbsp boiling water
40gm choc-covered coffee bean (i didnt use) 


Butter cream:
100gm unsalted butter
100gm icing sugar sifted
2 tsp instant coffee dissolved in 1 tbsp boiling water
Dark choc, finely grated


Steps :
1. Melt chopped dark choc in bowl over a pan of simmering water, set aside to cool
2. Beat butter n sugar till pale n fluffy
3. Beat in eggs, one at a time, 
4. Stir in melted choc n cocoa powder, mix well
5. Sift flour into mixture n stir in. 
6. Stir in coffee, followed by coffee bean
7. ** i added 4 tbsp milk
8. Bake for 20mins or until a skewer inserted in d centre n comes out clean
9. Cool on rack.


Topping
Beat butter, icing sugar n coffee untill pale n fluffy
Sprinkle finely grated dark choc


This espresso sachet gives strong coffee taste that we like!

Sunday, January 3, 2021

云集会的圣餐

昨天组群里传来了一道信息:

  “2021年的线上聚会: 每个月的 第一周 将会有圣餐。请弟兄姐妹在家自备 饼和杯 ,我们将在线上一起领用圣餐,记念主耶稣基督 🍷🥖🙏❤️”


自从云集会后就无法领用圣餐了,收到信息后立马就动手做无酵饼,掺了一汤匙天然酵母糊,加入面粉,揉了一小面团,擀平,在平锅盘里烤。


一汤匙的天然酵母面糊,加入面粉和少许盐,揉成面团,在平底锅干炒。

第一片,太大!儿子吃了[哈哈] 他说好吃还想要!

第二片,还是有点大,感觉还是怪怪的。。。好像少做了一点什么来着。。。[费解]

第三片,忽然想起以前做无酵饼用叉子在面皮上刺了许多洞,这样就不会气泡鼓起来。


第四片,觉得每一次就只有我们俩,那么久切成小小的长方形,这次PERFECT!完美了![舔屏]


圣餐的意义是叫我们纪念耶稣基督为我们牺牲自己。


「林前11:24」 祝谢了,就擘开,说:“这是我的身体,为你们舍的(“舍”有古卷作“擘开”)。你们应当如此行,为的是记念我。”

满满的❤️

Saturday, January 2, 2021

Burnt Cheesecake Thermomix Recipe

 Burnt Cheesecake Thermomix Recipe 


Everybody's favourite, we especially love the creamy burnt cheesecake, to know more about the origin of burnt cheesecake, read  this article that explains how this cake was invented and became popular. 

This recipe is adjusted by Lee Yong to suit our taste, adjusted the duration of baking, the size of a baking tin.... after many trials. I hope you love this recipe.

Burnt Cheesecake Thermomix Recipe

Ingredient A

250g Cream cheese, room temperature
100g Yoghurt
20g Lemon Juice
240g Whipping Cream
1/4 tsp Vanilla Essence

Ingredient B

150g Sugar
35g Cornstarch
4     Eggs

Preparation:

1. Preheat oven 200°C for 15 minutes

2. Put ingredient A to blend
    2 min / speed 5 (adjust time if using chilled cream cheese)
    Scrap down and blend again when needed.

3. Add ingredient B one at a time, start with sugar
    2 min / speed 5 
    While mixing, via feeding hole, sift in cornstarch, slide in one egg at a time.

4. Increase speed
    1 min / speed 5
 
5. Line a 7" round baking tin with baking sheet with at least 10cm extended up 
    leaving enough edges for easy handling.

6. Sift mixture into baking tin, bake for 25cm to 30 min

7. Open a gap of oven door, leaving baking tin in oven for 15 minutes. 
    The centre is runny and jiggly when you move the tin, this is what we want.

8. Allow to cool at room temperature. 

9. Cover with sling wrap. Chill for a few hour, remove paper before serving.

Creamy Burnt Cheesecake Slice

Bon appétit


Here is Burnt Cheesecake Recipe Template 


Friday, January 1, 2021

Vietnam Baguette Thermomix Recipe

Vietnam Baguette Thermomix Recipe

越南法棍面包 小美食谱


Ingredient A 

330g Water
2 1/4 teaspoon dried yeast (7-10g)

Ingredient B

500g Cake Flour
1 1/2 Teaspoon salt
1 Tablespoon sugar

Preparation

1. Place ingredient A into mixing bowl and warm
    2 min / 37°C / speed 2. Meanwhile, lightly grease a large bowl and set aside.

2. Add ingredient B and knead
    2 min / knead. Transfer dough into prepared bowl. Cover bowl with cling film or a damp kitchen until it doubled in size ( approx. 1 hours)

3. On a lightly floured surface, separate dough into 8 equal pieces. Gently flatten and roll each piece loosely into a log shape and set aside on a lightly floured surface. Dust rolls lightly with flour, cover with cling film or a damp kitchen towel and allow to rest for 20 minutes.

4. Again, gently flatten each piece of dough into a rectangle, taking care to preserve the air bubbles trapped within. Roll dough again into a log shape. Pinch seam of roll with your fingers to seal. Elongate roll into a baguette shape, rolling back and forth exerting gentle pressure from the middle of the baguette to its ends. Place baguettes seam-side down onto baking paper, pulling up paper between baguettes to create a low wall. This will help baguettes to hold their shape and will prevent them from sticking to each other as they rise. Cover baguettes loosely with cling film or a damp kitchen towel and let rise for further 45 minutes.

5. 20 minutes before end of rising time, place baking trays into middle part of oven, and another baking tray for storing water in the lowest part of oven.
    Preheat oven to 250°C.

6. Prepare approx. 100g very hot water in a cup. Score baguettes. Slide baguettes, together with baking paper, onto the top preheated baking tray. Quickly but also carefully splash the hot water onto the lower baking tray to create steam and immediately close oven door to trap the steam. Bake for 20 minutes, or until dark golden brown. If baguettes seem quite brown before end of baking time, reduce oven temperature to 230°C. Allow baguettes to cool for 20 minutes before slicing.

越南长棍面包 小美食谱

材料 A 

330克 水
2 1/4 茶匙 干酵母粉 (7-10克)

材料 B

500g Cake Flour
1 1/2 Teaspoon salt
1 Tablespoon sugar

做法

1. 将材料A放入锅
     2 分 / 37°C / 速度2 
同时,将大碗抹上一层薄油备用

2. 加入材料B
    2 分 / 揉面团
将面团放入抹好油的大碗中,用保鲜膜或湿的厨用毛巾覆盖,静置发酵直到两倍大 (约 1 小时)

3. 将面团放在撒了面粉的台面,用长刀子将面团切成 8 等份,轻轻地杆平并松松地卷成圆柱状,静置在撒了面粉的台面上。在面团卷上撒上一些面粉,用保鲜膜或湿的厨用毛巾覆盖,静置约20分钟。

4. 再一次将每份面团轻轻地杆开成长方形,并非常小心地不要弄破面团里的气泡,再次将面团卷成圆状状,用您的手指都将面团的接缝捏合,将面团卷整型成法国长棍面包型状,从面团卷中间开始轻轻施力并前后滚动至它的两端,将法国长棍面团的接合面朝下放在烘焙纸上,将面团中间的烘焙纸拉高形成矮壁,使每个面团都独立被隔开,这样面包就能够维持它的形状,并且避免互相粘住。用保鲜膜或湿的厨用毛巾轻轻覆盖面团,再一次静置45分钟。

5. 发酵结束20分钟之前,放一个烤盘放在中层,另一个放在最低层呈水之用。预热烤箱250°C。

6. 准备一杯大约 100°C 的热水,用尖刀划出一条裂痕,将面包联通烘焙纸一同滑进烤盘。小心迅速地将热水倒进最下层的烤盘,使烤箱产生蒸汽,立即关上烤箱的门留住蒸汽在里头。以250°C烤20分钟或直到颜色呈现深金黄色。如果面包在烘焙结束前已呈现深黄色,则将烤箱温度调降至230°C,取出面包放20分钟,待凉后切片食用。


Wednesday, December 30, 2020

Oreo Duo Colour Bread Thermomix Recipe

 Oreo Duo Colour Bread Thermomix Recipe

奥利奥双色面包 小美食谱


按自己喜欢叠放
Stack on top of each other, roll up.


放入烤盘等待发酵第二次


可以加入绿茶抹,别有风味。
Variation recipe with matcha powder.

Sewing Octopus Etsy MIni Shop

YoU May Also LikE theSe sToRies:

Related Posts Plugin for WordPress, Blogger...